3. html and
Xhtml Language
3.1 Introduction to html (Hyper Text Markup Language),
XML and Xhtml
The
html, a document-layout and hyperlink-specification language, developed by Tim
Berners-Lee in 1991. The html 3.0 standard, developed by the html Working Group
of the World Wide Web Consortium or W3C (www.w3c.org)
in 1994, which defines a fixed set of syntax and semantics to tell browsers how
to publish and display hypertext document on the World Wide Web (WWW). In 1996,
the W3C XML Working Group released XML (Extensible Markup Language)
specification as the universal format for structured documents and data on
the Web. Since then, XML is a widely accepted nonproprietary technology for
data exchange on the Web. In the today's
Internet age, html became a fundamental part of the medium for encode corporate
information dissemination (i.e. product advertising, reports, etc) for WWW. And
in 2000, the W3C recommended Xhtml specification to replace html 4.0.1 and to
give necessary support for working with XML documents.
Versions
of html and Xhtml standards include
- html 2.0 - Developed in 1994 and
published through RFC 1866, RFC 2854; historic status
- html 3.2 - W3C recommendation for
publishing in 1996 (tables, applets, text-flow around images
- html 4.0 - published in December 1997,
and superceded by version html 4.0.1
- html 4.01 - released in December 1999, fixing
some bugs of html 4.0
- Xhtml 1.0 - Extensible HyperText Markup
Language 1.0 is a reformulation of html 4.0 and is a WC3 recommended
standard released in January 2000
- XHTM 1.1 - released in April 2001
Previous Versions
of html (source – www.w3c.org)
The html
4.01 Recommendation released on 24th December 1999 fixes a number of bugs
in the html 4.0 specification. The list of changes are detailed in appendix A.
First released as a W3C Recommendation
on 18 December 1997. A second release was issued on 24 April 1998 with changes
limited to editorial corrections. This specification has now been superseded by
html 4.01.
W3C's recommendation for html which
represented the consensus on html features for 1996. html 3.2 added
widely-deployed features such as tables, applets, text-flow around images,
superscripts and subscripts, while providing backwards compatibility with the
existing html 2.0 Standard.
html 2.0 (RFC 1866) was developed by
the IETF's html Working Group, which closed in 1996. It set the standard for
core html features based upon current practice in 1994. Note that with the
release of RFC 2854, RFC 1866
has been obsoleted and its current
status is HISTORIC.
Basic html document properties include
- Page titles (names of documents; not the file name)
- Background colors and images (appearance definition)
- Text color (distinguishing hypertext and regular text)
- Link color
When
we try to write a html document, major tags as listed below will be required:
- html -- indicates the beginning and ending of the html document
- Head -- Elements
- Title -- title of the page
- Body -- Main document
- Heading
- Text Sections: Paragraph, fonts, color, position, lists (numbered,
bulleted, and indented), tables
- Fill-Out Forms
- Specifying Hypertext Links to other files (text, image file, sound
file, video files)
- Embedding Images
- Embedding other objects: audio, video, stream video and audio (MPG
file)
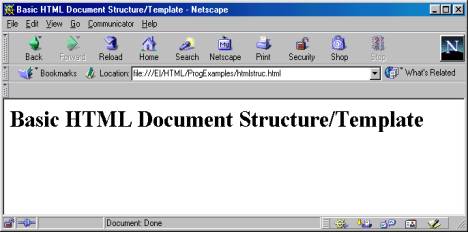
Example
3-1: A
simple page example shows basic structure of a html document or Web page.
<html>
<!-- htmlstruc.html
Author:
Version:
-->
<head>
<title> Basic html Document
Structure/Template </title>
</head>
<body>
<!-- Contents of html Document
-->
<h1> Basic html Document
Structure/Template </h1>
</body>
</html>
Various ways to view this page:
1. Start a
Window Explorer, double click the html file.

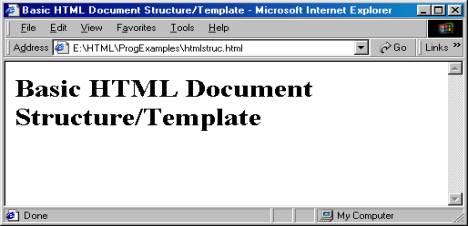
2. Start a Netscape Communicator to read this html
document file from a local drive you will use the following URL: file:///htmlstruc.html.
3.
To view the source code of this page:
Microsoft IE6: View --> Source
(through Microsoft Notepad)
or
Right mouse click to view the source
code
Netscape Communicator: View -->
Page Source
or
Right mouse click to view the source
code
4.
To save a copy of opened html file
Microsoft IE6: View --> Source
(through Microsoft Notepad)
or
Right mouse click to view the source
code (Microsoft Notepad)
then
Save As htmlstrc_2.html
3.2
html Elements and Attributes
Types
of Tags (Elements)
·
Tags are keywords contained
in pairs of angle brackets
·
Standalone tags do not
have end tags.
·
Example of standalone
tags are image tag <img>, line break tag <br>, horizontal rule
<hr>, document information tag <meta>, and language information tag
<base>.
Attributes
Attributes are added within a tag to extend or
modify the tag's action. Most attributes can take values, which follow an equal
sign (=) after the attributes name
Structured
Markup Tags (for overall document)
Begin Tag End Tag Meaning
<html> </html> Placed at the beginning and end of the
document
<head> </head> Define the header portion
<title>
</title> Define the title
of the document
<body> </body> Define document body
<!--
--> One line comment
<!-- This is a comment -->
Optional head Elements
The
following tags may also be placed within the <head> tag:
<base> -- Establish the document base
location
<meta> -- Provide keywords, descriptions to search engines, and
client pull functions
<link> -- Link a document to another document or an
external style sheet
<script>
-- Add JavaScripts and VBScripts
<style>
-- Add embedded style sheet
base
- For indicating the
base or starting location for all relative URLs with partial URLs address
- For mirroring another
Web site such as
<base href=" www.microsoft.com/PR/">
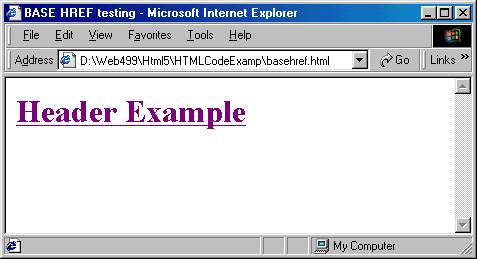
Example
3-2: The BASE tag used in this
example sets up a code base reference to all linked URLs in a page.
<html>
<!-- basehref.html -->
<title> BASE href testing </title>
<head>
<BASE
href="http://www.etcs.ipfw.edu/~lin/html/">
</head>
<body>
<h1>
<!-- The file
"headers.html" is loacted in the
<BASE
href="http://www.etcs.ipfw.edu/~lin/html/">
-->
<A
href="headers.html"> Header Example
<br>
</h1>
</body>
</html>
3.3 Structured Tags
·
Structured Markup
Tags (for overall document)
Begin Tag End Tag Meaning
<html> </html> Placed at the beginning and end of the
document
<head> </head> Define the header portion
<title>
</title> Define the title
of the document
<body> </body> Define document body
<!--
--> One line comment
<!-- This is a comment -->
3.3.1 <body> Tag and
Attributes
Colors
<body BGCOLOR="color"> --
Background color
<body
TEXT="color"> -- Text color; default - black
<body
LINK="color"> -- Hyperlink color; default - blue
<body
VLINK="color"> -- Visited link; default - purple
<body ALINK="color"> -- Clicked active link; default -
red
Background Tile Graphics (use small size file)
<body BACKGROUND="background.gif">
Browser Margin (10 to 12 pixels)
To turn off margin:
<body MARGINWIDth=0 MARGINHEIGH=0 LEFTMARGIN=0 TOPMARGIN=0>
3.3.2 Text Formatting
Heading, break, lines, quotes
Begin Tag End Tag Meaning
<h1> </h1> Heading
1
<h2> </h2> Heading
2
<h3> </h3> Heading
3
<h4> </h4> Heading
4
<h5> </h5> Heading
5
<h6> </h6> Heading 6
<p> </p> Paragraph
<hr> A
horizontal rule line
<br> A
line break
<ADDRESS> </ADDRESS> Signature of a authorship
<BLOCKQUOTE> </BLOCKQUOTE> Long
quotes
<q> </q> Designate enclosed text as an inline
short
quotation
<PRE> </PRE> use its original,preformatted style, retaining
line break and spacing
<PLAINTEXT> Render the remainder of the
document as
preformatted plain text
<XMP> </XMP> Turn off html interpretation for the paragraph;
for displaying program
code or scripts
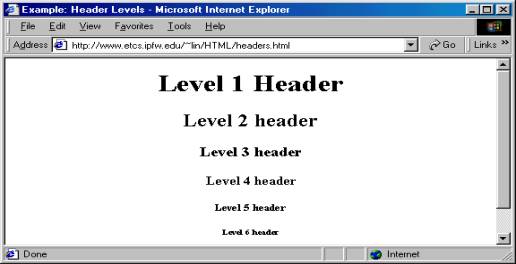
Example 3-3: The heading example illustrates how to display the
text in various font sizes.
<html><head>
<title>Example: Header Levels</title>
<!-- header.html à
</head>
<body>
<!-- Centers everything in the center element à
<center>
<h1>Level 1 Header</h1> <!-- Level 1 header à
<h2>Level 2 header</h2> <!-- Level 2 header à
<h3>Level 3 header</h3> <!-- Level 3 header à
<h4>Level 4 header</h4> <!-- Level 4 header à
<h5>Level 5 header</h5> <!-- Level 5 header à
<h6>Level 6 header</h6> <!-- Level 6 header à
<P>Normal size</P>
</center>
</body>
</html>
3.3.3 Physical Character Styles Specification
Font, Bold, Italic, Center,
etc
Begin Tag End Tag Meaning
<b> </b> Boldface text
<blink> </blink> Cause text to flash on and off
<font> </font> Change Font size, color, and typeface
<I> </I> Italic
text
<TT> </TT> Fixed width, monospaced font
<center> </center> Center the display text
<strike> </strike> Draw a line through the text
<S> </S> Same as <strike> and may replace
<strike>
<U> </U> Underline the text
<sub> </sub> Display the enclosed text as Subscripts
<sup> </sup> Display the enclosed text as Superscripts
<big> </big> Increase font one size biger
<small> </small> Decreade font one size smaller
3.3.4 Logical Character Styles Specification
Emphasis, sample program
diplay, etc
Begin Tag End Tag Meaning
<em> </em> Emphasis
<strong>
</strong> Stronger
emphasis
<code> </code> Display computer code in fixed-width font
<samp> </samp> Sample program output display in a
mono-space
font
like <code>
<var> </var> A variable to a function
<cite> </cite> A citation or reference to another document
<kbd> </kbd> The
enclsoed text is fixed-width, keyborad-like
input
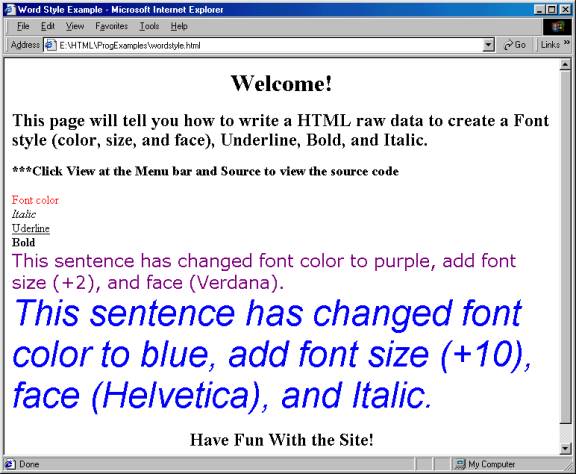
Example
3-4: A character style example
<!DOCTYPE html PUBLIC "-//W3C//DTD html 4.0
Transitional//EN">
<html>
<!-- wordstyle.html -->
<head>
<title>Word Style Example</title>
</head>
<body>
<h1 ALIGN = "center">Welcome! </h1>
<h2>This page will tell you how to write a html raw data
to create a Font style (color, size, and face), Underline, Bold, and
Italic.</h2>
<h3>***Click View at the Menu bar and Source to view the
source code</h3>
<!--Creating Font Color
-->
<P><font COLOR = "red">Font color
</font><br>
<!--Creating Italic
-->
<em>Italic</em><br>
<!-- Creating Underline
-->
<U>Uderline</U><br>
<!--Creating Bold
-->
<Strong>Bold</Strong><br>
<!--Creating Font color, size, face -->
<font COLOR = "purple" SIZE = "+2" FACE =
"Verdana">This sentence has changed font color to purple, add font
size (+2), and face (Verdana).</font><br>
<!--Creating Font Style
-->
<font COLOR = "blue" SIZE = "+10" FACE =
"Helvetica"><em>This sentence has changed font color to
blue, add font size (+10), face (Helvetica), and
Italic.</em></font>
<h2 ALIGN = "center">Have Fun With the
Site!</h2></P>
</body>
</html>
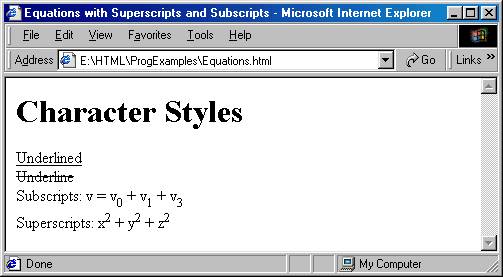
Example
3-5: This example displays
equations on a Web page.
<!-- equations.html à
<html>
<head>
<title>Equations with Superscripts and Subscripts</title>
</head>
<body BGCOLOR="WHITE">
<h1>Character Styles</h1>
<u>underlined</u><br>
<strike>underline</strike><br>
Subscripts: v = v<sub>0</sub> + v<sub>1</sub> + v<sub>3</sub><br>
Superscripts: x<sup>2</sup> + y<sup>2</sup> + z<sup>2</sup><br>
</body>
</html>
Example
3-6: This example shows how to accomplish the following tasks:
- Add an email address
for contacting other person
- Writing text in the
subscript or superscript format
- Striking out the
paragraph for collaborative editing
- Adding special signs
such as greater than (>), less than (<), etc.
<html>
<!-- contact.html
-->
<!-- Inserting special characters -->
<head>
<title>ECET/ EET 499 </title>
</head>
<body>
<!-- Creating e-mail link -->
<P>My email
address is <A href = "mailto:lin@ipfw.edu"> lin@ipfw.edu</A>. Click on the address
and your browser will automatically open
an email message (Outlook).</P>
<!-- Special characters are entered using the form &code;
-->
<P>All
information on this site is <strong>©</strong> ECET Department<strong> &</strong>
IPFW.</P>
<!-- Text can be struck out with a set of
<DEL>...</DEL> -->
<!-- tags, it can be set in subscript with
<sub>...</sub>, -->
<!-- and it can be set into superscript with
<sup...</sup> -->
<DEL><P>Show
cross line in this sentence</DEL><br>
<font color =
"Blue"> Square character, 10 <sup>2</sup> = 100. </font><br>
<font color =
"red"> This is a normal sentence. </font>
<sub> This
sentence is below regular sentence.</sub>
<font color =
"red"> This is also a normal sentence.</font><br>
<!-- Onter special characters -->
Other special characters: <strong>1 <
¼; a>b; or
b<a</strong></P>
</body>
</html>

3.3.5 Image Tag
Tag Meaning
<img SRC=”…” > Insert an
inline image into the document
ALT=" .." Specify alternative text to display if
an image is not
displayed
SRC=" .." URL of an image file
HEIGHT=n n pixels
WIDth=m m
pixels
BORDER=n n pixel boarder line
ALIGN=".." TOP, BOTTOM, MIDDLE, LEFT, RIGHT
Image File Formats
- GIF (Graphic Interchange Format)
- Two types; GIF87a and GIF89a (improved)
- 8-bit, 256 colors
- Loss less compression
- Well-suited for any image with areas of flat color, such as logos,
line arts, icons, and cartoon-like
- Transparent
- For adding simple animation without using plug-in technology
- JPEG (Joint Photographic Expert Group)
- 24-bit RGB color
- Some color information may lost in the compression process
- Ideal for photographic and other continuous images such as
watercolor illustrations Not good for solid color
- PNG (Portable Network Format)
3.3.6 Hypertetx Linking (Anchor)
Begin Tag End Tag
<a> </a>
Absolute Link:
where
the attribute href refers to the URL address of the HyperText REFerence document:
href=”address”
<P> Indiana university-Purdue university Fort Wayne:
<a href =
"http://www.etcs.ipfw.edu/~lin">
http://www.etcs.ipfw.edu/~lin </a> </p>
<P> Yahoo:
<a href = "http://www.yahoo.com">
http://www.yahoo.com </a>
</p>
<a href="http://www.w3.org/">W3C</a>
Relative Link:
In
the same directory
<a href =
"mynewpage.html">
..</A>
In
a higher level directory
<a href =
"../newpage.html">
..</A>
Linking
within a Document:
Give a section with a NAME so that other links can
reference:
<a NAME="Web Programming" > Web
Programming for Industrial Applications </a>
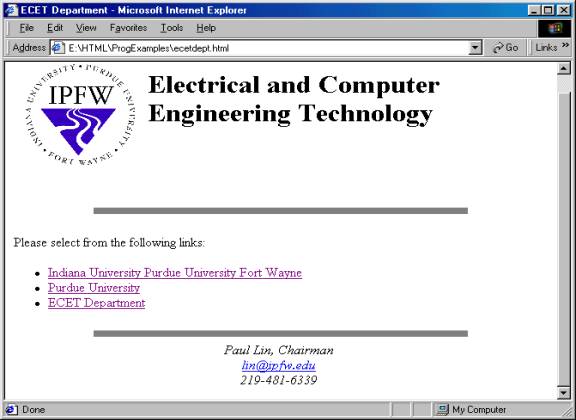
Example
3-7:
This example shows how to add image file and add links to a Web page.
<!DOCTYPE html PUBLIC "-//W3C//DTD html
3.2//EN">
<html>
<!-- ecetdept.html -->
<head>
<title>ECET Department</title>
</head>
<body BACKGROuND="" BGCOLOR="#ffffff"
TEXT="#000000" LINK="#0000ff" VLINK="#800080"
ALINK="#ff0000">
<center>
<img SRC="ipfwlogo.gif" ALT="IPFW Logo"
HEIGHT=150 WIDth=150 ALIGN="LEFT">
<br>
</center>
<h1> Electrical and Computer Engineering Technology
</h1>
<br> <br> <br> <br>
<hr WIDth=70% SIZE=8 NOSHADE>
<br><P>Please select from the following
links:</P>
<uL>
<LI><A href="http://www.ipfw.edu">Indiana
university Purdue university Fort Wayne</A>
<LI><A href="http://www.purdue.edu">Purdue
university</A>
<LI><A
href="http://149.164.36.204/ECET_Web/ECEthOME.html">ECET
Department</A>
</uL>
<hr WIDth=70% SIZE=8 NOSHADE>
<center>
<ADDRESS ALIGN=center>Paul Lin, Chairman<br>
<A
href="mailto:lin@ipfw.edu">lin@ipfw.edu</A><br>
219-481-6339<br>
</ADDRESS>
</center>
</body>
</html>
3.3.7 Numbered, Bulleted, and Indented Lists
Ordered, unordered lists,
menu items, etc
Begin Tag End Tag Meaning
<ol> </ol>
An Ordered (numbered) list
TYPE="a" -- lower case a, b, c, etc
TYPE="A" -- upper case A, B, C, etc
TYPE="1" -- number 1, 2, 3, etc
TYPE="I" -- Roman numbered I, II, etc
TYPE="i" -- Roman numbered i, ii, etc
<ul> </ul> An
unordered (bulleted) list
TYPE=
"DISC", "CIRCLE", and "SQuARE"
<menu> </menu> A menu list of items
<dir> </dir> A
directory listing
<li > </li> A
list item
<dl> </dl> A definition list or glossary list
<dt> A
definition term
<dd> The
correponding definition to a definition term
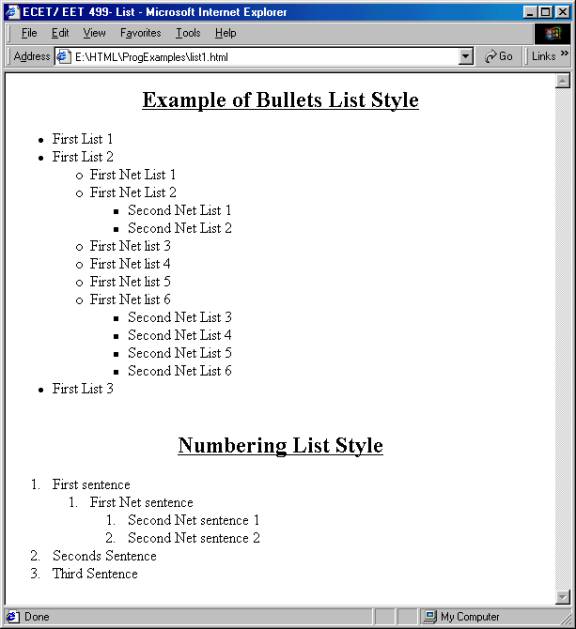
Example
3-8:
This example shows how to create a Web document that uses unordered lists and
ordered lists.
<html>
<!
File name: list1.html -->
<head> <title>ECET/ EET 499-
List</title> </head>
<body>
<center>
<h2><u>Example of Bullets List
Style</u></h2>
</center>
<!-- List Bullet style start with ul and
follow by li -->
<ul>
<li>First List 1 </li>
<li>First List 2</li>
<!-- This starts a nested list, which uses
a modified -->
<!-- bullet. The list ends when you close
the <ul> tag -->
<ul>
<li> First Net List 1</li>
<li> First Net List 2</li>
<!-- Another nested list, there is no
nesting limit -->
<ul>
<li>Second Net List 1</li>
<li>Second Net List 2</li>
</ul> <!-- This ends the double nested list -->
<li>First Net list 3</li>
<li>First Net list 4</li>
<li>First Net list 5</li>
<li>First Net list 6</li>
<ul>
<li>Second Net List 3</li>
<li>Second Net List 4</li>
<li>Second Net List 5</li>
<li>Second Net List 6</li>
</ul>
</ul>
<!-- This ends the first level nested list -->
<li>First List 3</li>
</ul>
<!-- This ends the primary Bullet list -->
<br><center><h2><u>Numbering
List Style </u></h2></center>
<!-- Ordered lists are constructed in the
same way as -->
<!-- Numbering list style, starting tag is
<OL> -->
<OL>
<li>First sentence</li>
<OL>
<li>First
Net sentence</li>
<OL>
<li>Second
Net sentence 1</li>
<li>Second
Net sentence 2</li>
</OL>
</ol>
<li>Seconds Sentence</li>
<li>Third Sentence</li>
</OL></body></html>
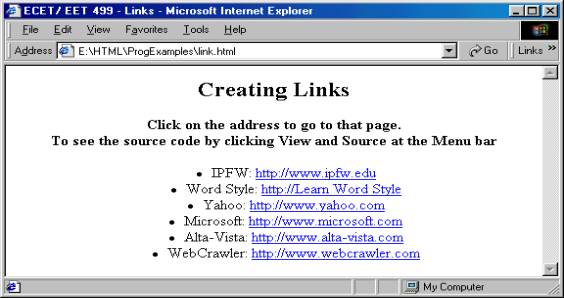
Example
3-9:
This example shows how to create a Web page that links to other URL.
<html>
<!-- link.html -->
<!-- unordered Lists
-->
<head>
<title>ECET/ EET 499 - Links</title> </head>
<body>
<center>
<h2>Creating Links</h2>
<P><strong>Click on the address to go to that page.
<br>
To see the source code by clicking View and Source at the Menu
bar</strong></P>
<!-- <ul> creates a new unordered (bullet) list -->
<!-- <li> inserts a new entry into the list -->
<ul>
<li>IPFW: <A href = "http://www.ipfw.edu">
http://www.ipfw.edu</A></li>
<li>Word Style: <A href =
"http://149.164.36.204/buttons/WordStyle.html"> http://Learn Word
Style</A></li>
<li>Yahoo: <A href =
"http://www.yahoo.com"> http://www.yahoo.com</A> </li>
<li>Microsoft: <A href =
"http://www.microsoft.com"> http://www.microsoft.com</A>
</li>
<li>Alta-Vista: <A href =
"http://www.alta-vista.com"> http://www.alta-vista.com</A>
</li>
<li>WebCrawler: <A href =
"http://www.webcrawler.com">
http://www.webcrawler.com</A></li>
</ul>
</center>
</body>
</html>
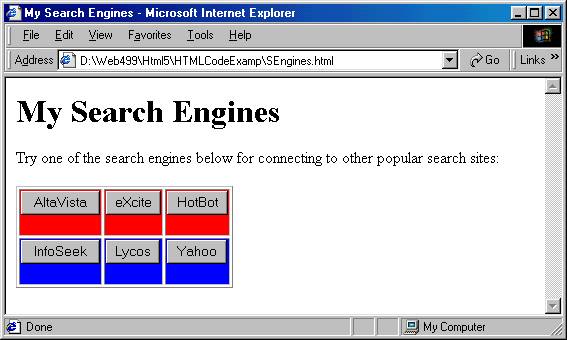
Example
3-10: A search engine example.
<!-- sengine.html-->
<html>
<head>
<title>My Search
Engines</title>
</head>
<body>
<h1>My Search Engines</h1>
Try one of the search engines below for connecting
to other popular search sites:
<P>
<table BORDER=1>
<tr
BGCOLOR="RED"><TD><FORM ACTION="http://www.altavista.com/">
<INPuT
TYPE="subMIT" VALuE="AltaVista">
</FORM>
<TD><FORM
ACTION="http://www.excite.com/">
<INPuT
TYPE="subMIT" VALuE="eXcite">
</FORM>
<TD><FORM
ACTION="http://www.hotbot.com/">
<INPuT TYPE="subMIT"
VALuE="HotBot">
</FORM>
<tr
BGCOLOR="BLuE"><TD><FORM
ACTION="http://www.infoseek.com/">
<INPuT
TYPE="subMIT" VALuE="InfoSeek">
</FORM>
<TD><FORM
ACTION="http://www.lycos.com/">
<INPuT
TYPE="subMIT" VALuE="Lycos">
</FORM>
<TD><FORM
ACTION="http://www.yahoo.com/">
<INPuT
TYPE="subMIT" VALuE="Yahoo">
</FORM>
</table>
</body>
</html>
3.4 Tables
Table and table row, heading cell, and data cell.
Begin Tag End Tag Meaning
<table> </table> Create a table
Attributes:
BORDER, AlIGN, WIDth, CELLSPACING,
CELLPADDING,
BGCOLOR, RulES, FRAME
<caption>
</caption> Caption of a
table
<tr> </tr> Define table rows
Attributes;
AlIGN (left, right, center), VAliGN
(top,
middle, bottom)
<th> </th> Table heading cell
Attributes;
COLSPAN, ROWSPAN, AliGN, VAliGN,
WIDth, HEIGHT
<td> </td> Table data cell
<thead> </thead> A table heading
<tbody> </tbody> A new group with a table
<tfoot> </tfoot> A table footer
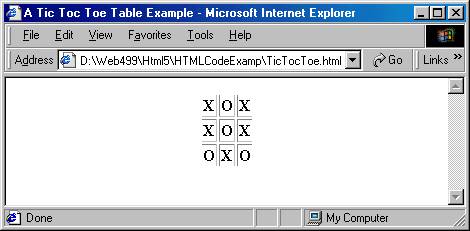
Example
3-11: Creating a Tic-Toc-Toe Table.
<!-- tictoctoe.html
->
<html>
<head>
<title>A Tic Toc
Toe Table Example</title>
</head>
<body>
<center>
<table BORDER=1 FRAME="VOID">
<tr><th>X<th>O<th>X
<tr><th>X<th>O<th>X
<tr><th>O<th>X<th>O
</table>
</center>
</body>
</html>
3.5 Script and Applet for Adding
Programming Language Features
<script> </script> Define a script within the document
Attributes
charset=name Define character set used to encode
the script
defer Defer execution of the script
language=lang Specify the language used
src=uRL Specify the uRL of an external
script to be
loaded
type=type Specify the MIME type of the
script
<param> </param> Supply a parameter to the <applet> or <object>
surrounding the tags
Attributes:
Id = name
Name=string
Type=type
Value=string
Valuetype=type
JavaScript
Examples:
<applet> </applet> Insert an executable applet
align= position
alt = string
archive=url -- a class archive to be downloaded,
and search for code class
class=name -- a style class controlling the
appearance of the tag
code=class -- the class code to be executed by Java
virtual machine within Web browser
codebase=url
Examples of
Applets:
Activities
- ©Determine
the resource needed for designing a Web site for the SuNXYZ Co., that
sales PCs directly through the Web. The company has the following
departments; PRODuCT SALES, TECHNICAL supPORT, ACCOuNTING, PERSONNALE,
SHIPPING
- ©Architect
and organize the SuNXYZ Co., Web site by determining folders or
directories for appropriate department. Creating the folders for the
departments as listed above.
- use Notepad editor to
create your first incomplete html document -- the homepage for the SuNXYZ
Co. Refer to example 1 for the basic tags needed. This page should include
the following TAGS and Attributes:
<html>
<!-- index.html
Author: Your Name
Date: Today
Authoring Tools: Microsoft Notepad
-->
<head>
<title>SuNXYZ
Co., </title>
</head>
<body>
<h1>
This page is under the construction. </h1>
</body>
</html>
- Save this incomplete
homepage as "index.html" in the A drive.
- View the index.html
using both Microsoft Internet Explorer and Netscape Navigator browsers.