HTML 5 Tables and Forms
Tables
for Tabular Data Display
Tables
can be used to represet information in a two-dimensional format. Typical table
applications include calendars, displaying product catelog, inventory data,
price table, financial data, calenders, etc. A two-dimensional table include
caption, heading cell, row datal, and borders if needed.
As
shown in HTML5 4.9 Tabular Data, http://www.w3.org/TR/html5/tabular-data.html. The elements
that defined in HTML 5 for creating tables can be found:
Element Meaning
<table> </table> The table element represents data with more
than one
dimension in the form
of table.
Attributes: BORDER, ALIGN, WIDTH,
CELLSPACING,
CELLPADDING,
BGCOLOR, BACKGROUND
<caption> </caption> The caption element
represents the title of the
Table.
<colgroup> </colgroup> The colgroup
element represents a group of one
or more columns in the
table.
<tbody> </tbody> The tbody element represents a block of
rows
that consists of a body
of data.
<col> </col> The col
(column) element represents one or more
columns in the coloum
group.
<thead> </thead> The thead element represents the block of
rows
that concists of the
column lables (headers).
<tfoot> </tfoot> The tfoot element represents the blocj of
rows
that concists of the
column summaries (footers)
<tr> </tr> The tr element defines a row of ceslls in
a
table.
Attributes: ALIGN (left, right,
center), VALIGN
(top, middle, bottom)
<td> </td> The td
element represents a data cell in a tbale.
<th> </th> The th
element represents a header cell in a table.
Attributes: COLSPAN, ROWSPAN, ALIGN,
VALIGN,
WIDTH, HEIGHT
Table
Border Styles Examples: (Figure 5.8, pp. 179, Text Book: Fundamentals of Web Development, 2nd
Edition)
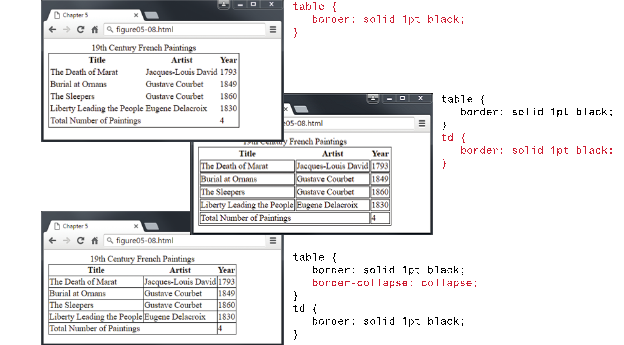
<style>
table { border: solid
1 pt black; }
</Style>
<style>
table {border: solid 1 pt
black;}
td {border:
solid 1 pt black;}
</style>
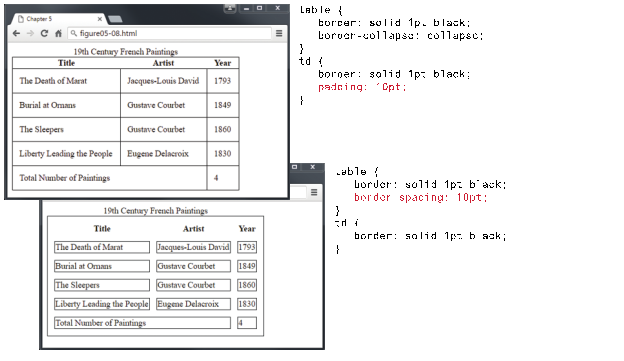
<style>
table { border: solid 1 pt black; border-collapse: collapse;}
td { border: solid 1 pt black; padding: 10 pt;}
</style>
<style>
table { border: solid 1 pt black; border-spacing: 10pt;}
td { border: solid 1pt black;}
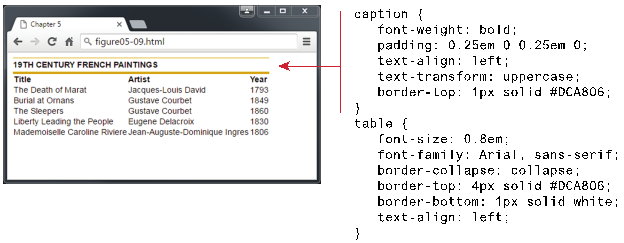
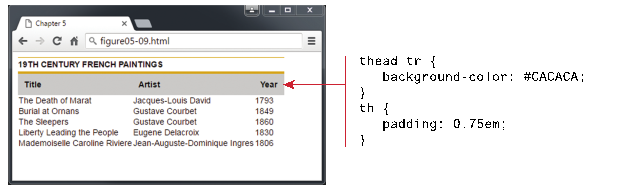
Examples
of Boxed Tables – Styles (Figure 5.9, pp. 180, Text Book: Fundamentals of Web
Development, 2nd Edition))
<style>
table{
font-size: 0.8 em;
font-family: Aerial, Helvertica,
sana-serif;
border-collapse: collapse;
border-top: 4 px solid
#DCA806;
border-bottom: 1 px solid white;
text-align: left;}
caption{
font-weight: bold;
padding: 0.25em 0 0.25 em
0;
text-align: left;
text-transform: uppercase;
border-top: 1px solid #DCA806;}
</style>
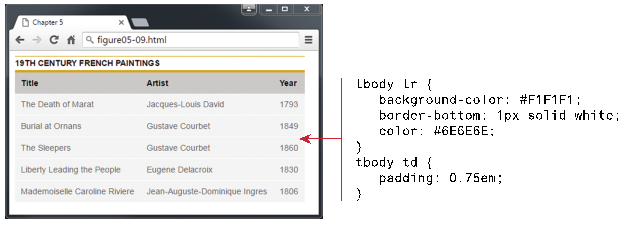
<style>
tbody tr
{
background-color: #F1F1F1;
border-bottom: 1px solid white;
color: #6E6E6E;}
tbody td {padding:
0.75em;}
</style>
<style>
table {
font-family: "Lucida
Sans", Verdana, Arial, sans-serif;
font-size: 1em;
}
tbody {
background-color: #F1F1F1;
}
td, th {
padding: 0.5em;
}
thead, tfoot
{
background-color: #CACACA;
}
caption {
font-size: 1.2em;
font-weight: bold;
background-color: #DCA806;
padding: 0.5em;
}
tbody tr:nth-child(odd) {
background-color: white;
}
</style>
Hover
Effect and Zebra Strips – Table Examples (Figure 5.10, pp. 181, Text Book: Fundamentals of Web Development, 2nd
Edition)
<style>
tbody tr:hover{
background-color: #9e9e9e;
color: black;
}
</style>
<style>
tbody tr:nth-child (odd){
background-color: white;}
</style>
HTML
Forms
A <form>
element in a HTML page contains such <input> elements control as Text
box, Text Area, Check Box, Radio button, Multiple Selection, Submit Command
Button, Reset button, etc., that allows a Web page to
gather information from users and send them back to a Web server for further
processing.
HTML 5 section 4.1, describes :
“A form is a component of a Web page that has form
controls, such as text fields, buttons, checkboxes, range controls, or color
pickers. A user can interact with such a form, providing data that can then be
sent to the server for further processing (e.g. returning the results of a
search or calculation). No client-side scripting is needed in many cases,
though an API is available so that scripts can augment the user experience or
use forms for purposes other than submitting data to a server.
Writing a form consists of several steps, which
can be performed in any order: writing the user interface, implementing the
server-side processing, and configuring the user interface to communicate with
the server.”
The HTML5 specifications for Forms can be found
at http://www.w3.org/TR/html5/forms.html.
Form
Element and Attributes
You
will need to use the following syntax for creating a form. All controls must appear
between two <form> and </form> tags. A general <form> syntax using
name, action, and method attributes is as shown below:
<form
name=
thisName action = thisAction
method
=thisMethod>
</form>
Where:
- The name
attribute is the name or ID of form to use in the document.
- The action
attribute is the name of application program, a CGI program, on the server
with valid URL that will be called to process the information.
- The method
attribute specifies how the controls' value will be transmitted to the
server via HTTP protocol. There are two methods: POST (environment
variable) and GET (no special characters; for example, 1 < ¼; a>b;
or b).
Begin Tag
End
Tag Meaning
<form> </form> Indicates a form
Attributes;
ACTION, METHOD, ENCTYPE, TARGET,
NAME,
ONSUBMIT, ONRESET
Global attributes defined in the HTML 5, 4.10
Forms (http://www.w3.org/TR/html5/forms.html
), include
- accept-charset
– Character encoding to use for form submission
- action –
URL to use for form submission
- autocomplete
– Default settings for autofill feature for controls in the form
- enctype
– Form data set encoding type
- method –
HTTP method to use for submission of form submission
- name –
Name of form to use in the document.forms
API
- novalidate
– Bypass form control validation for form submission
- target –
Browsing context for form submission
Example (Figure 5.11, Page 182 of Text Book: Fundamentals of Web
Development, 2nd Edition, Sample HTML form)
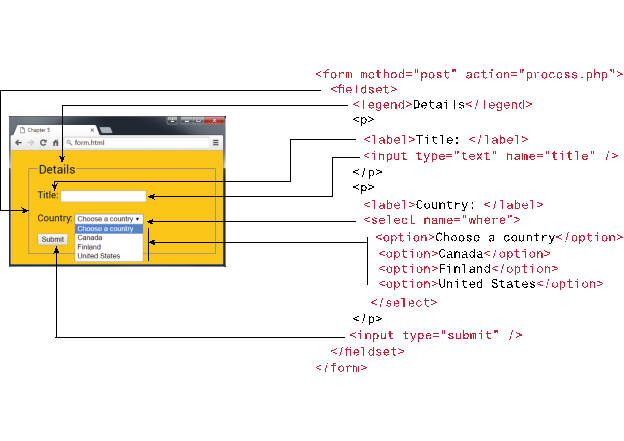
<form
method=”post” action=”process.php”>
<fieldset>
<legend> Details
</legend>
<p>
<label> Title: </label>
<input type+ “text” name =”title”/>
</p>
<p>
<label> Country: </label>
<select name=”where”>
<option> Choose a Country </option>
<option> Canada </option>
<option> Finland </option>
<option> United States </option>
</select>
</p>
<input type =”submit/”>
</fieldset>
</form>
Input Element and Attributes
Ref: HTML 5, The Input Element, http://www.w3.org/TR/html5/forms.html#the-input-element
Begin Tag
End
Tag Meaning
<INPUT> Define
an input element such as TEXT field,
radio
button, check box, and pass word field
for
a form.
Attributes:
TYPE, NAME, VALUE, ALIGN, CHECKED,
MAXLENGTH,
SIZE, SRC, ONCLICK, ONDBCLICK,
ONSELECT,
ONCHANGE, ONFOCUS, OBBLUR
Input Types and Variables
Text
Box for Input
<INPUT
TYPE="text" NAME="lastname">
Submit
and Reset Buttons
<INPUT
TYPE="SUBMIT">
<INPUT
TYPE="RESET">
Text
Control
The
text control is a box that the users can enter a single line of text such as
name, address, and so on.
<input
type= text name= "TextName" value = "DisplayInBox"> < /FONT>
CheckBox
Control
ChekBox
control is similar to check box in Visual Basic, a little square with an option
checkmark. It is used to present a list of options, which the users can select
more than one. The control's value can be 0 or 1; for example, checked (1) or
cleared (0).
<input type = checkbox name =
"check1">FirstBox < /FONT>
RadioButton
Control
RadioButton controls are used to present lists of
options, similar to the CheckBox control, but it
allows one of them can be selected.
<input
type = radio name ="level">Beginner<br>
<input
type = radio name ="level" checked>Intermediate<br>
<input
type = radio name ="level">Advanced<br>
Command
Button
Control
Comment button can perform only two actions in the browser (Submit and Reset)
without Script (VBScript, JavaScript, or PerlScript).
The Submit command is to submit the entered data on the controls to the server.
The Reset command is to reset all control values on the Form to their original
values.
<input
type = submit value = "Send Data"> < /FONT >
<input
type = reset value = "Reset Value"> < /FONT >
Text Area Tags and
Attributes
The TextArea control is similar to the Text control, but it
allows the entry of multiple lines of text. The TextArea
control can also defined with row and column.
Begin Tag
End
Tag Meaning
<TEXTAREA> </TEXTAREA>
Create a multi-line text entry area.
Attributes:
NAME, ROWS, COLS, WRAP, ONSELECT,
ONCHANGE,
ONFOCUS, ONBLUR, ONKEYDOWN,
ONKEYPRESS,
ONKEYUP
<TEXTAREA
NAME=".." ROWS=xxx, COLS=yyy>
</TEXTAREA>
Select and Option Tags and Attributes
Begin Tag
End
Tag Meaning
<SELECT> </SELECT> Create a combo box or a list box to let user
select
among many multiple predefined options.
Attributes:
NAME, SIZE, MULTIPLE, ONCLICK,
ONFOCUS,
ONBLUR, ONCHANGE
<OPTION> </OPTION>
Attributes: VALUE, SELECTED
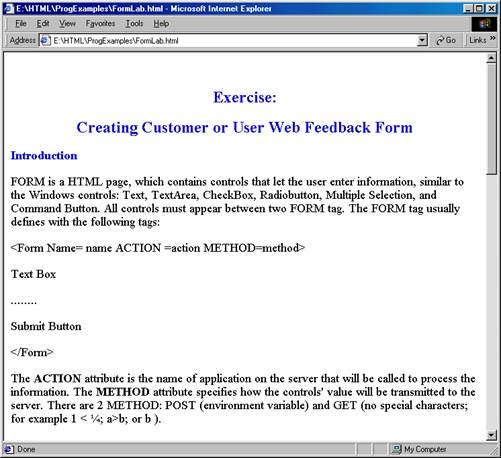
Example: The following example
"FormLab.htm" will help you to understand the form basics. It
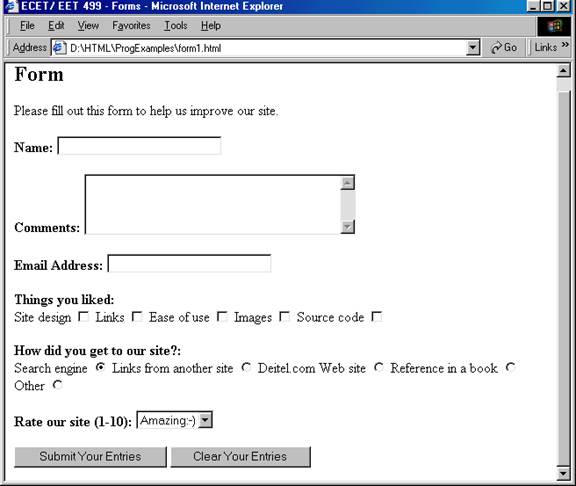
Example: A user feedback form example. http://www.etcs.ipfw.edu/~lin/CECourses/2_HTML/05FormsEx/form1.html
<HTML>
<!-- httpd\HtDocs\buttons\form1.html -->
<HEAD>
<TITLE>ECET/
EET 499 - Forms</TITLE>
</HEAD>
<BODY>
<H2>Form</H2>
<P>Please fill
out this form to help us improve our site.</P>
<!--The code below is a method that calls cgi program or server program (ASP, perl...)
in Server side when the users -->
<!-- click the Send button below-->
<!--Cgi program or server program then generates the
output from the server and send the result back the client-->
<!-- This example will not work in this lab
-->
<!-- Initial Form tag is needed -->
<FORM METHOD =
"POST" ACTION = "/cgi-bin/formmail">
<!--A text box named "name"; it is like
a text box name in Visual Basic Programming language -->
<!--Whenever the users type in the text box, the
string (value) will equal to "name" -->
<!--like a variable in Programming; for example,
name = " string" if the users type string in the text box. -->
<!-- When the users click the Send button, the
client will send name's value to the server. -->
<!--The server will be able to retieve string from "name" and generate the
result (as the program set up)-->
<!--Case Sensitive -->
<!--all tags in the form work the same way such
as text box, TextArea, radio, Check, and
selection-->
<!--All tags with the send button need to be in
the same form tag to work together.-->
<!--Creating text box named "name", and
size 25 character -->
<P><STRONG>Name:
</STRONG>
<INPUT NAME =
"name" TYPE = "text" SIZE = "25"></P>
<!-- Another text box name "comments" (textarea), also have row and column option-->
<P><STRONG>Comments:</STRONG>
<TEXTAREA NAME =
"comments" ROWS = "4" COLS =
"36"></TEXTAREA>
</P>
<!--Another text box name "email"; Type
password means when the user type, * will display on screen -->
<P><STRONG>Email
Address:</STRONG>
<INPUT NAME =
"email" TYPE = "password" SIZE =
"25"></P>
<!--Checked box selection like VB; different name
will present different value -->
<P><STRONG>Things
you liked:</STRONG><BR>
Site design
<INPUT NAME =
"thing" TYPE = "checkbox" VALUE = "Design">
Links
<INPUT NAME =
"thing1" TYPE = "checkbox" VALUE = "Links">
Ease of use
<INPUT NAME =
"thing2" TYPE = "checkbox" VALUE = "Ease">
Images
<INPUT NAME =
"thing3" TYPE = "checkbox" VALUE = "Images">
Source code
<INPUT NAME =
"thing4" TYPE = "checkbox" VALUE = "Code">
</P>
<!-- <INPUT TYPE="radio"> creates
a radio button. The -->
<!-- difference between radio buttons and
checkboxes is -->
<!-- that only one radio button in a group can be
selected -->
<!--Only 1 name to present radio's value -->
<P><STRONG>How
did you get to our site?:</STRONG><BR>
Search engine
<INPUT NAME =
"how get to site" TYPE = "radio"
VALUE = "search engine"
CHECKED>
Links from another
site
<INPUT NAME =
"how get to site" TYPE = "radio"
VALUE = "link">
Deitel.com Web site
<INPUT NAME =
"how get to site" TYPE = "radio"
VALUE = "deitel.com">
Reference in a book
<INPUT NAME =
"how get to site" TYPE = "radio"
VALUE = "book">
Other
<INPUT NAME =
"how get to site" TYPE = "radio"
VALUE = "other">
</P>
<!--Like a combox in VB
-->
<!-- The <select> tag presents a drop down
menu with -->
<!-- choices indicated by the <option>
tags -->
<P><STRONG>Rate
our site (1-10):</STRONG>
<SELECT NAME =
"rating">
<OPTION
SELECTED>Amazing:-)
<OPTION>10
<OPTION>9
<OPTION>8
<OPTION>7
<OPTION>6
<OPTION>5
<OPTION>4
<OPTION>3
<OPTION>2
<OPTION>1
<OPTION>The
Pits:-(
</SELECT></P>
<!--Send button; when the users clik the Sned button, the all
values in the form will be sent to the server -->
<INPUT TYPE =
"submit" VALUE = "Submit Your Entries">
<!--Reset button, when it is clicked, it will
reset all onformation to the defult
values-->
<INPUT TYPE =
"reset" VALUE = "Clear Your Entries">
</FORM> <!-- End of
Form tag -->
</BODY>
</HTML>
Query
String, Get and Post Methods.
A browser will package the user’s data input
from Form/Input elements into something called Query String which is a series
of name=value
pairs separated by ampersands (& symbol) and send it back to the requested
web server with either Get or Post method.
·
Get method:
o The
browser locates the data in the URL of the request
o It
uses URL to send the query string, form data will be saved when the user
bookmarks a page; including user name and password.
o It
may post a potential security risk for shared use computers
o You
will use it for testing or developing a web system
·
Post method:
o The
form data is located in the HTTP header after HTTP variables
o ??
Paswwords
Run the user input form example as shown above,
located as http://www.etcs.ipfw.edu/~lin/CECourses/2_HTML/05FormsEx/form1.html;
then enter the following data into the form; finally click the Submit Your
Entries button.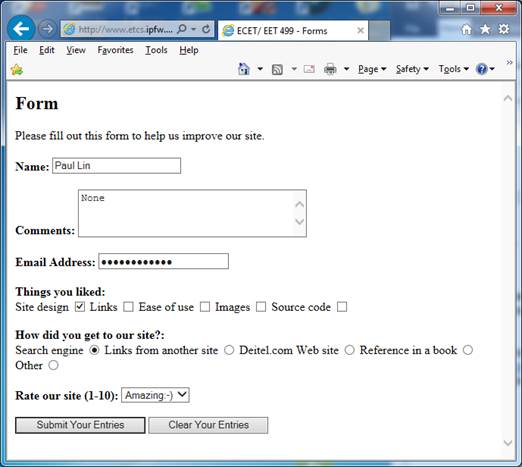
The browser will pack all the inputs and send
it to a server CGI script called formmail.
<FORM METHOD =
" POST " ACTION = "/cgi-bin/formmail">
in the following
format:
POST /cgi-bin/formmail
http/1.1
Date: Mon, 19 September 2017 14:27 GMT
Host: ….
User-Agent: …
Content-Length: xx
name=Paul
Lin&comments=None&email=lin@ipfw.edu&thing=Design&how%20get%20to%20
site=search%20engine&rating=10
where %20 is  
character.